
| Access your email from here |
| You can find my musings and notes on Linux at JustLinux.ca |
| There are lots of free books at Project Gutenberg |
| Register your phone numbers with the Canadian Do Not Call list, and stop telemarketers from calling. |
Making an anchor
In "Haul Out", I showed the float assembly for my haul-out. That float has been anchored with a temporary anchor (a "killick") for too long. I wanted a heavy anchor that couldn't be easily dragged or lifted from it's final resting place. A boat anchor wouldn't do; it would be too light or too expensive, and a heavy anchor would be very difficult to get up to the cottage to install. So, I made my own anchor from stuff I had around the cottage.
The anchor consists of a short, wide block of concrete with an eye-bolt emerging from the top. The eye-bolt connects, within the concrete, to a length of chain, in order to resist the upward pull of the mooring float. A wide washer fastened to the end of the eye-bolt provides a minor additional resistance.
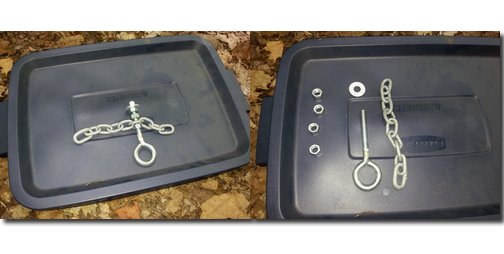
I prototyped out the eye-bolt assembly, prior to constructing the anchor. It consisted of
- 1 6" eyebolt,
- 1 length of galvanized anchor chain,
- one washer, and
- four nuts.
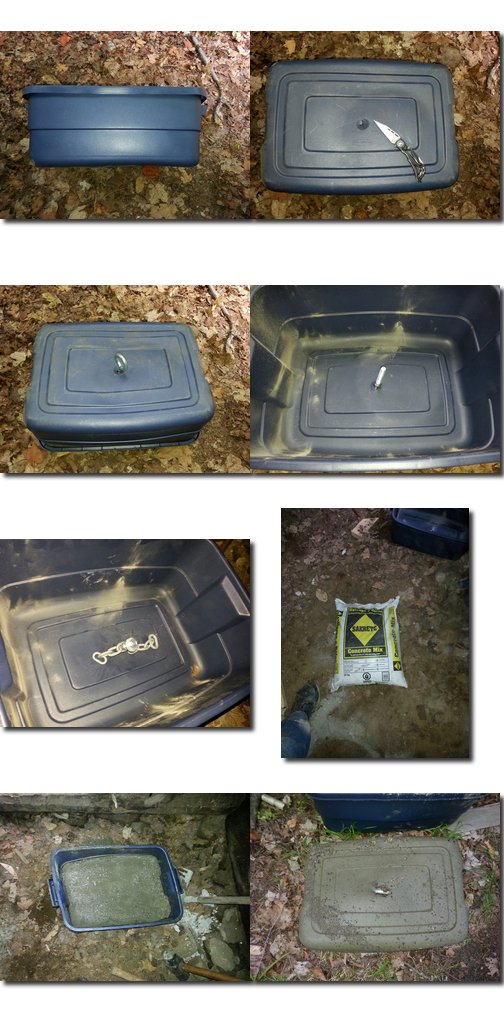
I selected a Rubbermade tub as the form for the concrete. I would fill it half-way up the sides with the concrete mix, embedding the eye-bolt in the concrete through a hole in the bottom of the tub.
First, I slit a cross in the bottom of the tub, at the dimple in the centre, and inserted the eye-bolt through this hole, with the eye outside of the tub. I next affixed a nut to the eye-bolt on the inside of the tub, near (but not at) the bottom. I used a hammer and small anvil to squash the nut on the bolt, ensuring that it would not turn and loosen.
Next, I placed one link of the chain over the eye-bolt, and affixed it in place with another nut. This nut was also squashed to the bolt, ensuring that it would not loosen.
Finally, I sandwiched the washer between two more nuts, placed on the end of the eye-bolt and again squashed for tightness. I then dug a shallow groove in the dirt, and placed the tub, face up, over it. This allowed the eye-bolt to extend vertically in the tub.
For the anchor itself, I mixed a bag of concrete mix, and poured it into the tub. I fished the ends of the chain off the bottom of the tub, and embedded them in the concrete. I also smoothed over the top of the concrete; this will become the bottom of the anchor when I invert the tub and remove the set concrete.
After letting the concrete set for 24 hours, I inverted it, widened the slit through which the eye-bolt had been inserted, and removed the entire concrete anchor. The anchor needs additional time to cure before I can place it in the water.
- Lew Pitcher's blog
- Log in to post comments

Comments
Nice try, but no Cigar
After four years of use, my Rubbermade Tub mould anchor has given out. It was my first attempt at anchor-building, and worked OK for the first year or so. But, last year, it kept shifting, and over the winter shifted so much that it wasn't worth repositioning any more.
So, I have taken the lessons learned from this attempt, and the lessons inherent in the design of a true killick, and constructed my second attempt at an anchor. This time, I took a 1 metre long length of 21cm (8 ½ inch) diameter cardboard concrete-forming tube, pierced it with three 40cm lengths of rebar (making 6 10cm radial spikes) and filled it with about 75 kg of concrete. A chain runs the interior length of the tube, giving the concrete some lengthwise reinforcement and providing a point to attach the haul-out's anchor chain.
Let's see if that fixes the problem.